Pick a New Engine | What to Look For | Making a Blank | Removing the Old Engine | Disconnecting Systems | Mounts and Coupler | Lifting the Old Engine | Engine Beds | Shimming | Filling Holes | Flat Mounts | Landing the Engine | Exhaust System | Other Systems | Finishing Up
Preparing the Engine Bed.
Preparing the Engine Bed- The first thing you will probably want to do is clean out the whole area. You’ll be in here a lot, and it would be really nice if you could put your spotless new engine into a spotless new engine bed. Once things are clean, it’s time to see if you need to modify the stringers.

If you are lucky, the engine will be able to be mounted on the existing stringers. If you are very very lucky the new engine will drop perfectly onto the old mounts. Unlikely. In fact so unlikely I have never seen it happen, or heard of it happening.
Even the models sold as a “drop in” replacement for a specific motor invariably need modifications to the stringers and repositioning of the mounts. Here is where the little plywood engine we made (you DID make it, right?) will save you days and days of testing and fitting, and dozens of engine lifting adventures.
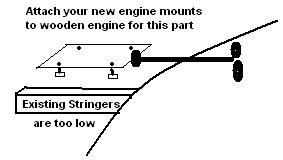
Simply bring the plywood engine in and see if it fits. Position the plywood engine so that the wooden coupling matches up with the existing shaft and coupler. Make sure the shaft is in the exact spot where it should be when the install is finished – if you moved it move it back now. This will give you a pretty good idea of how the final engine will sit in place when you install it. You will probably have something like this:
: 
If you skipped "Lifting the Old Engine ", click here to check it out
If you would like to use the content of these articles, please contact us.
